How to calculate the distance from the projector to the screen?

The key to correctly calculating the distance from the projector to the screen to obtain the desired image size is the throw ratio parameter. Let's talk about it in an accessible language.
Throw ratio
The value of this parameter is the ratio of the width of the image on the screen and the distance to it. The standard optics of each projector has minimum and maximum throw ratio limits (for devices with optical zoom), which are prescribed in the technical documentation. On their basis , the required distance from the object of the device to the projection canvas is calculated according to the following formula:
Throw distance = throw ratio ⋅ screen width (in any measurement value).
Let's assume that the picture from the projector will be broadcast to a screen with a diagonal of 100" (254 cm). The throw ratio for this imaginary model is stated in the range from 1.4/1 to 2.8/1. By simple mathematical calculations, the distance from the projector to the display will be 3.56-7.11 m:
- 1.4 ⋅ 254 cm ≈ 356 cm;
- 2.8 ⋅ 254 cm ≈ 711 cm .
 |
| Visualization of the key concepts that you have to deal with when installing a projector. |
Calculating the distance from the projector to the screen allows you to get the highest possible image quality after installation. The limit value of the distance depends on the functional characteristics of the device.
You can make it easier for yourself to choose the optimal width of the projection screen by changing the formula in your own way:
Screen width = throw distance / throw ratio.


It is impossible to do without calculations using this algorithm if a strictly defined place is allocated for the installation of the projector in the room. For example, on a bedside table at the opposite wall of the room, which is located at a distance of 5 m from the intended screen. With the known limits of the throw ratio from 1.4/1 to 2.8/1, we have the following:
- 500 cm / 1.4 ≈ 357 cm;
- 500 cm / 2.8 ≈ 179 cm .
As a result, with a well-known distance to the projector, a screen with a width of 1.79 to 3.57 m can be used together with it.
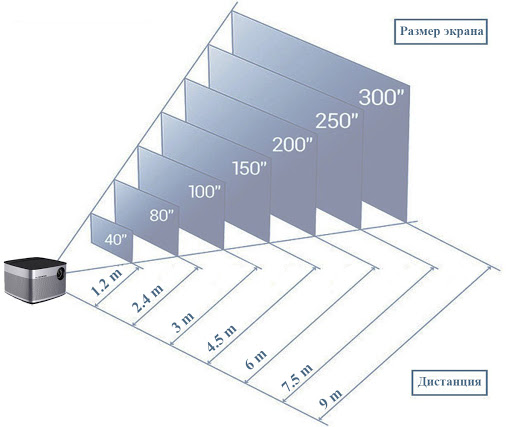 |
| The farther the projector is from the screen, the larger the diagonal dimensions of the latter. |
Object shift
In most cases, it will not work to install the projector "head-on" to the screen for a number of reasons. In a residential format room, furniture will prevent this, in an office or classroom — the principles of seating for spectators, etc. And if the beam from the object does not strike strictly opposite the centre, the image will be incorrectly projected onto the screen. In solving this issue, useful options for correcting trapezoidal distortions and shifting the object come to the rescue.
 |
| The optics shift function gives you more freedom of action when installing the projector. |
When using the optics shift function, the projector compensates for vertical or horizontal tilt without compromising the broadcast quality. In fact, this makes it possible to hang the device from the ceiling or place the projector on the side of the audience.
The values of vertical and horizontal displacement are also easily calculated using simple formulas:
Projector mounting height = screen height ⋅ percentage of vertical displacement (prescribed in the technical documentation).
For example, our notorious screen with a diagonal of 100" (254 cm) has an aspect ratio of 16:9. That is, its height is approximately 143 cm. The percentage of vertical displacement for the proposed projector is stated as +96.3% (plus indicates the possibility of projecting the image above the object, minus — below it). The output is the value of the permissible deviation from the centre of the screen upwards of less than 1.38 m:
- 143 cm ⋅ 96.3 % ≈ 138 cm .
Now about the shift in the horizontal plane. The formula for calculating it is given below:
Horizontal position of the projector = screen width ⋅ percentage of horizontal displacement (prescribed in the technical documentation).
The horizontal shift of the object is offered by advanced-level models and this function is much less common than the shift along the vertical axis.


Features of the projector placement
An important point of the programme when installing the projector is the features of its placement in the serviced room. For example, office models are often hung from the ceiling in order to save space. In this case, it is necessary to provide reliable and high-quality fastening, as well as power supply. For suspended ceilings, you will need to buy a special mounting kit separately. With the ceiling mounting method of the device, try to avoid placing the spectator seats directly under it in order to avoid accidental falling of the projector.
 |
| The projector in this photo does not hang over the heads of the audience. |
Home-made projectors often carry short-focus optics on board with a throw ratio criterion of less than one. They can project an image onto the screen from the smallest possible distance (from a few centimeters). Projectors with short-focus optics will fit perfectly into the concept of deploying home theaters and will fit small "meeting rooms". Their complete opposite is models with long—focus optics, which allow projecting a clear image from a long distance.
 |
| There is a clear difference in the placement of projectors with short-focus and long-focus optics, provided that the image is output from them in the same size. |
Choosing a screen for a projector is a topic for a separate expanded material. Therefore, we will limit ourselves to just a couple of basic tips:
1. Choose a suitable place to place the screen indoors. If possible, on a wall on which direct light does not fall. If there is no other way, think about buying thick curtains.
2. Select the height of the screen placement. For example, for a house it should be hung at a height of 60-90 cm from the floor.
3. Determine the screen dimensions. How to do this with a known place of "registration" of the projector was discussed above in the section on the throw ratio.
We talked about the basic principles of calculating the required distance from the projector to the screen. They apply to all types of projection equipment, be it models for deploying home theater systems or office "workhorses".
Enjoy your viewing!


Articles, reviews, useful tips
All materials