Як почистити кондиціонер?
5 хв
оновлено 13 липня, 2021
Практично всі виробники кондиціонерів рекомендують як мінімум один раз на рік чистити повітряний фільтр, встановлений у внутрішньому блоці. Однак весь блок також має потребу в чищенні, так, як і на радіаторі і на валу скупчується величезна кількість пилу, яка може впливати на роботу пристрою і на легені людини. З цієї статті ви дізнаєтеся, як розібрати кондиціонер до «скелета» і почистити його від пилу.
Ця стаття написана професійним експертом без використання штучного інтелекту.
Ми незалежно перевіряємо товари та технології, які рекомендуємо.
Ми незалежно перевіряємо товари та технології, які рекомендуємо.

Поетапна чистка внутрішнього блока
Хоча ми розглянемо розбирання кондиціонера на прикладі навісний моделі, решта типів охолоджувальних пристроїв розбираються за схожим принципом з деякими відмінностями в коснструкции. Етапи чищення внутрішнього блока кондиціонера наступні:
- Спочатку відключіть пристрій від електромережі щоб уникнути ураження електричним струмом.
- Далі піднімаємо верхню кришку і виймаємо сітчасті фільтри (може бути один або два), як показано на малюнку нижче.
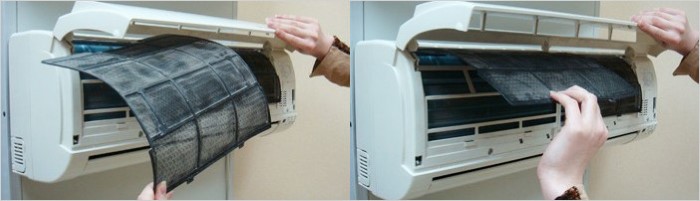 |
| Виїмка фільтрів |
- Потім знімаємо дезодоруючий фільтр, що складається з триколірного поролону і вузької металевої сітчастої вставки, яка надає поролону жорсткості. До речі для освіження атмосфери в кімнаті, після чищення можна обприскати фільтр освіжувачем повітря.
 |
| Триколірний фільтр |
- Знімаємо нижню кришку. Вона міцна і добре гнеться, тому взявшись за середину, відтягніть заслінку вниз, витягуючи спочатку один край, а потім інший (показано на рис.).
 |
| Зняття заслінки |
- Далі відкручуємо кришку, що закриває електроблок, а також три болти, що з'єднують корпус пристрою з підставою.
 |
| Відгвинчуємо чотири болта |
- Беремо плоску викрутку і акуратно піддягаємо кришку в місцях засувок (на малюнку нижче обведені червоним). Під час маніпуляцій буде характерний звук клацання.
 |
| Місця засувок |
- Піднявши передню частину корпусу, від'єднуємо шлейф, що з'єднує її з електричним блоком. Після цього її можна зняти і відправляти у ванну на чистку. Ні в якому разі не можна мити цю частину гарячою водою (нехай буде трохи теплою), оскільки пластик може деформуватися.
 |
| Знімаємо шлейф |
- Знімаємо іонізатор (якщо він є). Для цього відкручуємо один кріпильний шуруп, а також від'єднуємо червоний і чорний шлейфи. У різних моделях дроти різного кольору, але який з яким з'єднувати інтуїтивно зрозуміло. Іонізатор промиваємо під теплою проточною водою, оскільки на ній також скупчується пил.
 |
| Кріплення іонізатора |
- Знімаємо озоновий датчик. Легким рухом пальців виймаємо озоновий датчик з паза радіатора.
 |
| Озоновий датчик |
- Від'єднуємо дренажну ванночку для стоку конденсатора. Для цього потрібно клацнути дві ніжки і відкрутити кріпильні болти, розташовані по обох кінцях. Трохи піднявши, ванночка легко виймається з механізму.
 |
| Кріплення ванночки |
- Починаємо чистити радіатор. Беремо звичайну щітку, набираємо в тазик води (або використовуємо спеціальний засіб) і легким рухом вниз зчищають бруд з радіатора. Варто відзначити, що чищення радіатора необхідно робити до того, як знімемо внутрішній вал, оскільки при знятому валу радіатор буде бовтатися і його незручно буде мити. Деякі користувачі перед миттям радіатора спочатку проходяться по поверхні пилососом.
 |
| Чищення радіатора щіткою зверху вниз |
- Відкручуємо два болта на бічному фіксаторі радіатора і знімаємо його.
 |
| Бічний фіксатор радіатора |
- Прокручуємо вал таким чином, щоб нижній кріпильний болт виявився між двома лопостями. Відкручуємо цей болт, і трохи піднявши радіатор (показано на рис.), виймаємо вал з пристрою. Зверніть увагу, що болт закручений дуже щільно, тому замість звичайної шлицевої викрутки рекомендуємо використовувати насадку шестигранник, яка є у всіх инструментарных наборах.
 |
| Кріпильний болт валу (вид знизу) |
 |
| Виймаємо вал |
- Чистимо вал. Для цього можна використовувати мийку високого тиску, як на СТО або мотооприскувачі. Якщо таких приладів немає, то беремо щітку, як у випадку з радіатором і «отдраиваем» наш вал — це займе більше часу, але ефект буде практично такою ж.
 |
| Варіант мийки валу |
- Після того, як відмили і просушили всі деталі, збираємо пристрій у зворотному порядку і залишаємо на день не включеним в мережу, щоб остаточно вивітрилася вся волога. Після цього можна запускати кондиціонер.
Чистка зовнішнього блока
Чистка зовнішнього блока набагато простіше і швидше внутрішнього, і полягає вона в наступних етапах:
- Спочатку знімаємо решітку шляхом зняття чотирьох шурупів (на деяких моделях металеві застібки), обведених червоним на малюнку.
 |
- Потім відгвинчуємо гайку на крильчатці торцевим ключем. Зверніть увагу, що різьба у гайки ліва, тому відкручуємо її за годинниковою стрілкою.
 |
| Гайка на крильчатці |
- Після цього починаємо чистку випарника. Найкраще для цієї мети використовувати мийку високого тиску, оскільки вона відмінно «відбиває» бруд. Але якщо її немає, то, як і для валу внутрішнього блока можна використовувати мотооприскувач або миючий засіб. Струмені води намагайтеся направляти так, щоб вони не потрапляли на двигун (показаний на рис нижче.). Для цього можна закрити двигун целофановим пакетом.
 |
| Електродвигун |
- По завершенні прибирання пристрою поставте тому крильчатку і прикрутіть решітку.
Висновок
На чистку всього кондиціонера йде приблизно дві години. Звичайно, завжди можна викликати майстра, який зробить ревізію без вашої участі. Однак самостійна чистка значно заощадить ваші кошти, особливо якщо ви живете далеко від міста і виклик майстра ускладнює і здорожує логістика.
Читайте також:
Як вибрати кондиціонер?
Дізнайтеся, як вибрати кондиціонер з різноманітності моделей.
Дізнайтеся, як вибрати кондиціонер з різноманітності моделей.
П'ятірка кращих сталевих електрочайників об'ємом 1,7 літра
Чайники, які не розбавлять смак води пластиком і вскипятят її за лічені хвилини.
Чайники, які не розбавлять смак води пластиком і вскипятят її за лічені хвилини.
Непомітна чистота: ТОП 5 вбудованих пральних машин
Ідеальна чистота і свіжість, приховані фасадом.
Ідеальна чистота і свіжість, приховані фасадом.
І в спеку, і в холод: п'ятірка кондиціонерів з функцією обігріву
Каста спліт-систем, які ефективно борються як з літньою спекою, так і з лютою зимовою стужею.
Каста спліт-систем, які ефективно борються як з літньою спекою, так і з лютою зимовою стужею.
Між міксером і комбайном: ТОП-5 стаціонарних блендерів для домашньої кухні
Готуємо пюре, фарш, коктейлі і суміші одним натисненням кнопки.
Готуємо пюре, фарш, коктейлі і суміші одним натисненням кнопки.