Light filters in digital photography

Before moving on to choosing and buying a light filter, let's look at the types of these products and the basic methods of using them. Let's start with those that should be on every lens in any (almost any, to be absolutely accurate) shooting situation.
Protective filters
The main task of protective filters is to protect the front lens of the lens from the adverse effects of the external environment: scratches, dust, liquids, etc. In critical situations (fall, impact), a protective filter is able to save the lens, albeit at the cost of its “life”.
The only criterion when choosing a protective light filter is the minimum impact on the image. Checking the quality is quite simple: mount the camera on a sturdy tripod, take test shots of a static scene under constant lighting conditions with and without a filter. Then open the files in a graphics editor that supports layers, different blend modes and levels (Levels). Place a photo with a light filter on a layer above a picture without a light filter and select the blending mode Difference (Difference), if during the shooting the camera still shifted, align the images. Ideally, you should get a completely black picture, indicating that there is no difference between the pictures. Then enhance the differences with the Levels tool. In most cases, coloured noise will appear. This is normal, since there cannot be an perfect repetition of two frames with one camera — the supply voltage, matrix temperature, etc. change. However, if you notice the prevailing colour of the noise or even the contours of objects, it is better not to use such a filter. It gives either a spurious coloration, or, even worse, distortion.
The protective light filter must not affect the light passing through it. Its main task is to protect the lens from damage.
 |
|
A beam filter is used to create visible beams from light sources in pictures. (photo on the left — with a filter, on the right — without it) |
UV filters
Unlike "classic" protective filters, ultraviolet filters affect the light passing through them, blocking its high-energy ultraviolet component. Very often they are bought for reasons of cost savings. It turns out a 2-in-1 solution. Unless you're shooting under artificial UV light with a modified camera, this step is entirely worth it.
UV filters are indispensable for shooting in the mountains and at sea, where the proportion of short-wave radiation invisible to the eye is greater than usual(due to less absorption by the atmosphere and re-reflections). Although we hardly notice ultraviolet radiation, the digital camera matrix digitizes it, which leads to an unpleasant cold tint and a decrease in overall contrast (haze effect).
 |
|
A polarizing filter(photo above) removes reflections from non-metallic objects, primarily glass |
Polarizing filters
A detailed explanation of the principles of operation of a polarizing filter is beyond the scope of this material. There are two common use cases for light polarization in photography and one rare one.
Firstly, a polarizing filter is indispensable when shooting landscapes. It allows you to increase the saturation of the blue areas of the sky and increases the contrast of the clouds, making them voluminous, "dramatic". As a bonus, you will get some reduction in cold tone, which makes the frame nicer to look at.
Secondly, a polarizing filter removes reflections from non-metallic objects, primarily glass. As a result, the objects behind them, for example, behind shop windows, are seen much better, or the reflections of the surrounding world do not distract from the subject.
The polarizing filter also removes some of the glare from the water, making its surface textured.
A rare scenario for using polarizing filters is to create effects. Try photographing a transparent plastic object, such as a ruler, and you will see bizarre colour overflows.
There are circular (circular) and linear polarizing filters. The first is the only choice for owners of SLR cameras. The fact is that when using linear camera electronics, it will make mistakes when measuring the illumination of the scene, since the mirror or prism also polarizes the light. The error depends on the relative position of the polarization planes and reaches two exposure steps. Both circular and linear polarizing filters are available in both round and square designs, the type of polarizer is not related to the shape, this is a design feature.
 |
| Also, the Polarizing filter is indispensable when shooting landscapes (photo on the left — using a filter, on the right — without it) |
A polarizing filter is contraindicated for lenses in which, when focus, the front element with a thread for screwing on filters rotates. Fortunately, these are quite rare. The fact is that the result of the action of a polarizing filter depends on its orientation relative to the optical axis of the lens. Before shooting, the filter is rotated until the desired effect is obtained. If subsequent focus rotates the filter, you will have to rotate it again.
Neutral density filters
Neutral density filters affect all colours in the spectrum equally (in fact, almost the same), reducing the total amount of light entering the lens.
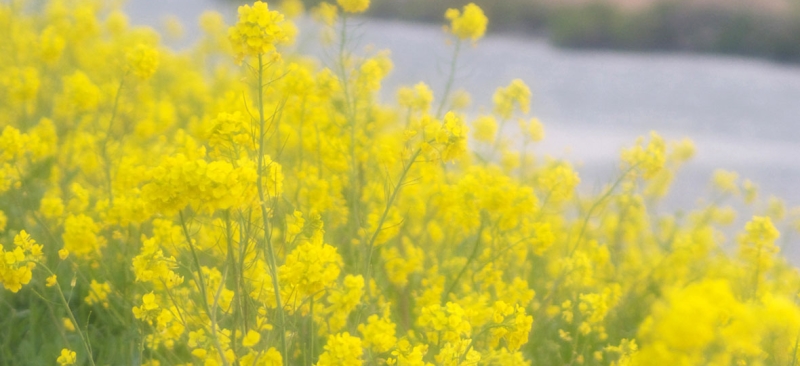
Why is this needed? There are two answers. Firstly, a neutral density filter allows you to set a sufficiently long exposure to blur moving objects in bright daylight, primarily flowing water in a landscape.
.jpg) |
|
An example of using a neutral density filter in the photo below, the photo above was taken without filters |
Secondly, the neutral density filter makes it possible to shoot at wide apertures in conditions of very intense scene illumination, for example, for portraits in the open air. An open aperture, as you know, allows you to reduce the depth of field in order to visually separate the object from the background. Of course, modern digital cameras with an electronic shutter allow you to set shutter speeds up to 1/32000 second, but while the technology is at the development stage, and if there are moving objects in the frame, the result looks comical.
Neutral density filters are marked according to the degree of reduction of the light flux, 2x means that the amount of light will be reduced by half, and this corresponds to one exposure step, i.e. aperture can be increased by one integer value.
Distribution received models with a multiplicity of x2, x4, x8 and x16. However, there are almost opaque x1000, which allow you to extend the shutter speed by 10 exposure steps.
Models with adjustable opacity are available, which are actually a pair of polarizing filters. During rotation, the plane of polarization changes, when they intersect, the light filter almost does not transmit light, when they are parallel, it transmits about half.
Not all ND filters are the same. Some cheap models can give a spurious coloration of the light flux passing through them. Of course, no one canceled the custom white balance, however, a change in the spectral composition leads to brightening / darkening of some objects, which may be undesirable. The verification consists in shooting a static test scene (even handheld) and then evaluating the results of digital indicators in a graphics editor. It is better to analyze in the Lab model, where the brightness is specified separately and can change; in any RGB variant, it is more difficult to understand whether there is a shift. Some models with a large multiplicity warm up the picture, the manufacturer warns about this.
Infrared filters
Infrared filters block the part of the spectrum visible to the eye and let long-wave (from 700 nm) radiation through, allowing you to shoot in invisible light.
Such frames look specific: since the greenery reflects a significant part of the infrared radiation, it turns out to be almost white, while the sky and water absorb, therefore they come out dark. As a result, the landscape becomes "winter", the clouds — very textured.
Before buying an infrared filter, you need to make sure that the camera is sensitive to this part of the spectrum. The easiest way to do this is to take a photo of the infrared LED remote control. If you can see it through the filter when you press any button, you can shoot. An alternative option is to modify the camera. As part of this almost irreversible procedure, the filter located on the matrix is removed, the device will become practically unsuitable for filming without a light filter, you will lose the manufacturer's warranty. Not all cameras can be upgraded, because some manufacturers do not use a separate filter in the form of a plate, but spray the coating directly onto the matrix chip.
When shooting with a non-modernized camera, get ready for long (units or even tens of seconds) shutter speeds. Modernized devices allow you to shoot handheld at shutter speeds in hundredths of a second. When photographing with SLR cameras, manual focus (and cropping) is far from always possible, only the Live View mode saves, but mirrorless devices, where the photographer sees a digitized and processed image, is an perfect solution.
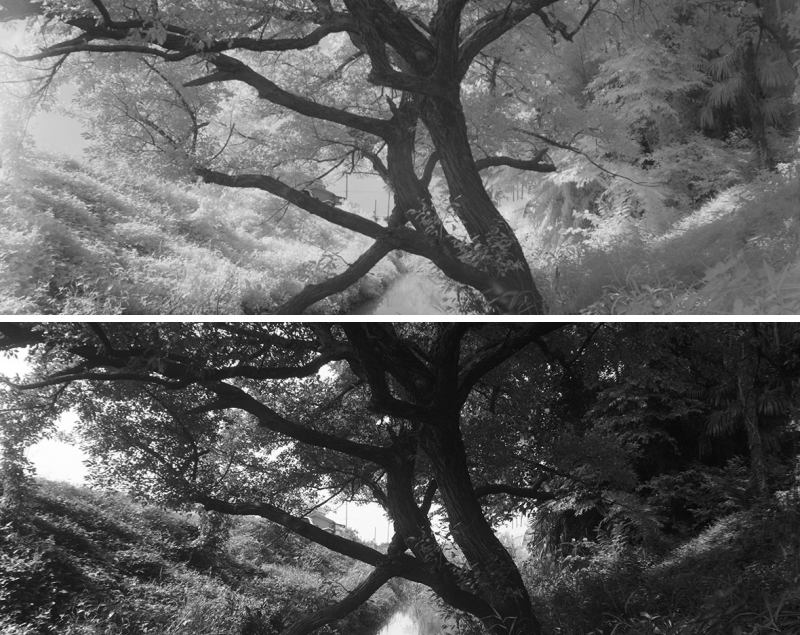 |
| Infrared filters pass long-wave (from 700 nm) radiation, allowing you to shoot in invisible light (top photo — with a filter, bottom — without) |
Gradient filters
Gradient filters allow you to equalize the brightness in different parts of the scene in order to avoid going beyond the boundaries of the dynamic range of the matrix and to avoid the loss of details in areas of overexposure or underexposure. Usually, they are used when shooting landscapes, where the sky is much brighter than the ground.
It is better to purchase square gradient filters with a holder, this will allow you to position the darkening area in the right place in the frame, while in round ones that screw onto the lens, you will have to frame the scene based on the capabilities of the filter.
There are not only neutral gradient filters, some manufacturers also offer colour ones.
macro lenses
Macro lenses are designed to focus on objects close to the front lens of the lens, as a result of which the latter occupy a sufficient area in the frame and, accordingly, look enlarged. In fact, macrolenses are a magnifying glass, even the magnification is indicated in the same way.
If you want to shoot macro and don't have the money for a special lens yet, a macro lens is a good choice, at least it allows you to understand if you are really interested in miniature things.
The law of conservation works when buying macrolenses: if it arrives somewhere, then it will definitely decrease somewhere. By saving money, you get more chromatic aberration and worse sharpness, especially at the edges of the frame.
Macro lenses give the best result (in terms of magnification) when working with telephoto lenses(focal length from 100 mm and more).
As an alternative, macro rings can be recommended, which are installed between the lens and the camera body, however, in this case, you may lose electrical contact (in low-cost models) and autofocus. Macro rings are best used with wide angle lenses.
Light filters for creating effects
Light filters used to create visual effects at the time of shooting should be singled out in a separate category. Two varieties are most popular — serving to soften the picture and the formation of rays around highlights / light sources.
 |
| An example of using a softening filter |
Softening (so-called "soft") light filters reduce contrast and sharpness, as a result, portraits (mainly women's and children's) look softer, more romantic. They are also used when shooting landscapes, adding "haze" and "understatement" to the scene. The result of using softening filters is very difficult to simulate in post-processing, since simple blurring does not add light halos around dark objects.
Light filters for forming rays around glare / light sources differ in the number of these same rays — four (cross), six, eight (star).
In photography, with the development of graphic editors, or rather, modules connected to them, plug-ins, the use of such light filters has lost its expediency: the effect is easier to simulate, more precisely controlling the parameters. However, when shooting a video, they give a very interesting picture, if used appropriately and properly.
Filter diameter
Most filters are round and come in frames of different diameters. This means that for each lens you can choose your own filter.
But what if there are several lenses with different diameters in the photographer's arsenal? The choice is up to the photographer — either to buy several filters of the same effect on transmitted light (which is quite expensive, but convenient), or to purchase a filter for the largest lens and a set of adapters that allow you to install a large filter on lenses with a smaller diameter (this is cheaper, but reduces efficiency when filming).
Unfortunately, the opposite option will not work in many cases: an attempt to install a small filter on a large lens will lead to darkening at the edges of the frame, vignetting, and it will be stronger, the greater the difference in diameters and the shorter the focal length.
There is an alternative to round filters — systems for using square (or round, but not screwed onto the lens, but installed in a special holder), which are produced, for example, by the French company Cokin and its southeastern imitators. This is a good choice for owners of a large fleet of optics, however, there are shooting situations in which additional measures are required to block stray light. It sounds abstruse, but the problem is most often solved by a piece of dense black cloth, which should be covered with a lens and filter holder.
When buying, pay attention to the height of the frame. For wide-angle lenses, it should be minimal, otherwise vignetting may appear.
Ten interesting camera features that you should pay attention to before buying and be sure to use after.
Both types of devices are actively developing, both evolutionarily and revolutionary.
Five great tripods that are popular among online shoppers.
A short list of the most important tips for a beginner photographer about the camera and its accessories.
We have selected five smartphones that can replace the usual camera.


Articles, reviews, useful tips
All materials
