How to format a hard drive

We independently test the products and technologies that we recommend.

The user has several ways to start the hard drive formatting service, which are generally identical for all versions of Windows. Let's talk about each of them in order.
By means of Windows
The simplest way to format a hard disk in Windows versions from XP and above includes the following procedure:
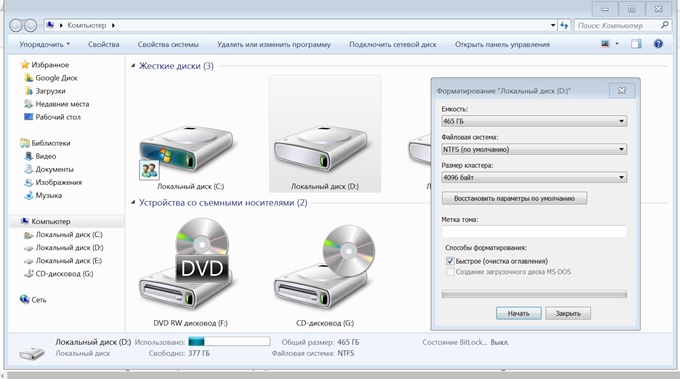
1. We go to "My computer".
2. Right-click on the required disk and select "Format" in the context menu that appears.
3. The settings window opens:
- "File system". NTFS is recommended, since unlike FAT32 it supports files larger than 4 GB;
- "Cluster size". It is set by default. We recommend not changing this parameter;
- "Volume label". You can not specify;
- "Formatting methods". Here we note whether it is fast or full, agree to delete the data and click "Start".
 |
Files and current programs are closed before starting the process.
The following method, using the Disk Management service, allows you to perform the cleaning procedure without restarting. You can get to the corresponding menu through the sequence of sections "Start — Computer — Computer Management — Storage devices — Disk Management", or through "Control Panel — Administration — Computer Management". In this menu, we find the disk we need and act according to the already familiar scheme.
 |
Using the command line
And now let's move on to a more advanced way of formatting a hard drive — through the command line. Unlike the previous ones, it is faster, but less visual, since it does not use the operating system interface. It is useful for users who prefer console computer management.
1. In the OS, type WIN + R, write cmd in the field that appears and click “OK”.
 |
2. We get into the command line window and enter one of the combinations to choose from, based on what kind of formatting is required:
Via BIOS
The following method, how to format a hard disk — through the BIOS, will come in handy when there is no way to boot into the system: it flew off, blocked by a virus, or you just decided to update the version, and at the same time format the disk space. Actually, the BIOS is designed to solve several other tasks and does not have the required functionality to work with drives. Therefore, more often the concept of formatting a "screw" from the BIOS means cleaning it and re-marking it using a bootable USB flash drive or disk, as well as third-party utilities that do not require booting into the OS, or by means of the Windows installer.
So, before formatting the hard drive through the BIOS, we write a bootable USB flash drive. To do this, we need a working machine with Daemon Tools (or UltraISO) installed on it, with which we create a disk image with the desired OS and write it to a flash drive with a volume of at least 4 GB. A very visual and easy—to-manage utility, Rufus, will help to do this. But there are others.
From a disk or USB flash drive
After writing down the boot drive, you can start formatting the Windows 7 and other versions of the hard drive, having previously configured the BIOS for this purpose. The procedure is as follows:
1. Insert the CD with the image into a disk drive or a USB flash drive.
2. Restart the computer and press one of the keys "Del", F1, F2, F3 or Esc several times before booting the OS to open the BIOS menu (the choice of command depends on the manufacturer of your PC or laptop or the manufacturer of the motherboard).
3. In the BIOS, go to the Advanced Settings – Boot Device Priority section and select our boot disk by default: CD ROM or USB Flash Drive, so that after restarting the computer starts from it.
 |
4. Press F10 and "OK" to save and exit the BIOS. After an automatic reboot, this window will appear.
 |
5. Press any key to start the installation programme.
 |
6. Press Shift+F10 to open a command window.
For Windows 8 or 8.1, we do it differently: "Language — Diagnostics — Additional features — Command line".
Further actions completely repeat the formatting process using the command line, starting from the 2nd point.
The manual on how to format a computer and install Windows XP is even easier:
- we take a Live CD,
- select the BIOS boot from the required drive,
- loading into the installer,
- select a disk in the explorer,
- click on it with the right mouse button,
- formatting.
By the Windows Installer
This method will be easy for those who have already mastered the previous ones. We perform all the same actions as when cleaning the hard drive using the command line when installing Windows, but instead of starting the command line mode, select:
- "Next" — "Full installation".
- Click on the desired disk and go to the subsection "Disk Settings – Format".
 |
Third-party utilities
This method requires the installation of special utilities that allow you to format and mark up the hard drive, both without booting into the system and directly in it. In the first case, the Gparted programme will help quite well. It is enough to write it to a USB flash drive, and boot from it according to the above instructions. And one of the most successful disk cleaning and re-partitioning programs in the system is considered to be HDD Low Level Format Tool.
The utility is effective even with severe damage to the magnetic surface of the drive. After installing and running it:
1. Select the disk we are interested in from the list and click "Continue".
 |
2. In the window that opens, go to the "Low-level formatting" tab, check the box next to the "Perform a quick cleanup" item, if you do not need to completely erase the data, and start the formatting process.
 |
At the end, a message with statistics will appear. It is important to note that the formatting speed in the free version of the programme is limited, and the process may take several hours. Another disadvantage of the programme is the inability to choose the cluster size.
By means of Mac PC
The need to format the "screw" and users of "Apple" devices was not spared, so the question of how to format a hard drive on a Mac, we could not leave unanswered. The operation is extremely simple. Necessary:
1. Use Launchpad to enter the "Other" section.
2. Find and open the "Disk Utility". In the left part of the menu that opens, all available disks will be displayed.
3. By clicking on the selected disk, go to the "Erase" tab.
4. In the "Format" item, select MS DOS FAT, rename the disk if you wish, and click "Erase".
The action is the same for both internal and external drives, as well as USB Flash.
Well, for a snack, we'll tell you how to format a PC for Linux in Ubuntu. Those who are more comfortable operating with a graphical interface will be saved by the previously mentioned GParted utility. Its functionality is clear and intuitive.
1. Install the programme with the command "sudo apt-get install gparted".
2. Next, run it from the terminal with superuser rights. To do this, we prescribe "sudo gparted".
3. Select the required disk, click the "Partition" tab at the top of the window — "Format".
 |
The possibilities of the programme are much wider, but it makes no sense to describe them entirely. For those who want to master the GParted functionality in more detail, we suggest reading the user manual.
That's all. We hope that our short guide has helped you form an idea of how to format a disk correctly.
Compact solutions that will help make the TV "smarter".
What to pay attention to when choosing a group 1 child car seat.
A selection of available suitcases with a capacity of up to 75 liters: the optimal choice for a couple or a young family.
A smart speaker for the home, a pair of gadgets with a Pro console and an updated line of laptops.
Five interesting premieres shown during the largest exhibition of computer equipment.


Articles, reviews, useful tips
All materials